LS Engine Reconditioning in Sydney
Oztrack inspects, machines and rebuilds LS engines in-house. We work on standard street engines, cammed combinations, strokers and supercharged builds, with the machining and clearances selected for the actual engine rather than a generic parts package.
What does LS engine reconditioning include?
Engine reconditioning restores the usable parts of an engine and replaces or machines the components that no longer meet the required condition or clearance.
It is more than fitting rings and bearings. The engine must be dismantled, cleaned and measured before the correct machining and parts can be selected.
- Complete dismantling and cleaning
- Block, crankshaft, bore and bearing inspection
- CNC boring, honing, surfacing or sleeving where required
- Piston, ring, bearing and valvetrain selection
- Ring gaps and operating clearances set for the application
- Blueprint assembly and final mechanical checks

LS engine removal, inspection, rebuilding and installation can be completed at Oztrack.
Which LS engines can Oztrack rebuild?
Oztrack reconditions naturally aspirated and supercharged Gen III and Gen IV LS engines used in Holden, HSV and performance conversions.
LS1 and LS2
5.7-litre and 6.0-litre engines for standard rebuilds, cammed street cars and performance combinations.
L76, L77 and L98
6.0-litre Commodore engines, including repairs involving lifters, camshafts, pistons, bores and oil systems.
LS3 and LSA
6.2-litre naturally aspirated and supercharged engines, including cylinder-wall damage, core shift and high-output builds.
How much does LS engine reconditioning cost?
The final cost depends on what can be reused, what must be machined and whether the engine is supplied separately or as a complete vehicle. An accurate plan requires inspection and measurement.
What should you send with an enquiry?
Tell us the vehicle model, engine type, kilometres, symptoms, current modifications and intended use. If another workshop has inspected the engine, include its measurements, photographs and fault findings.
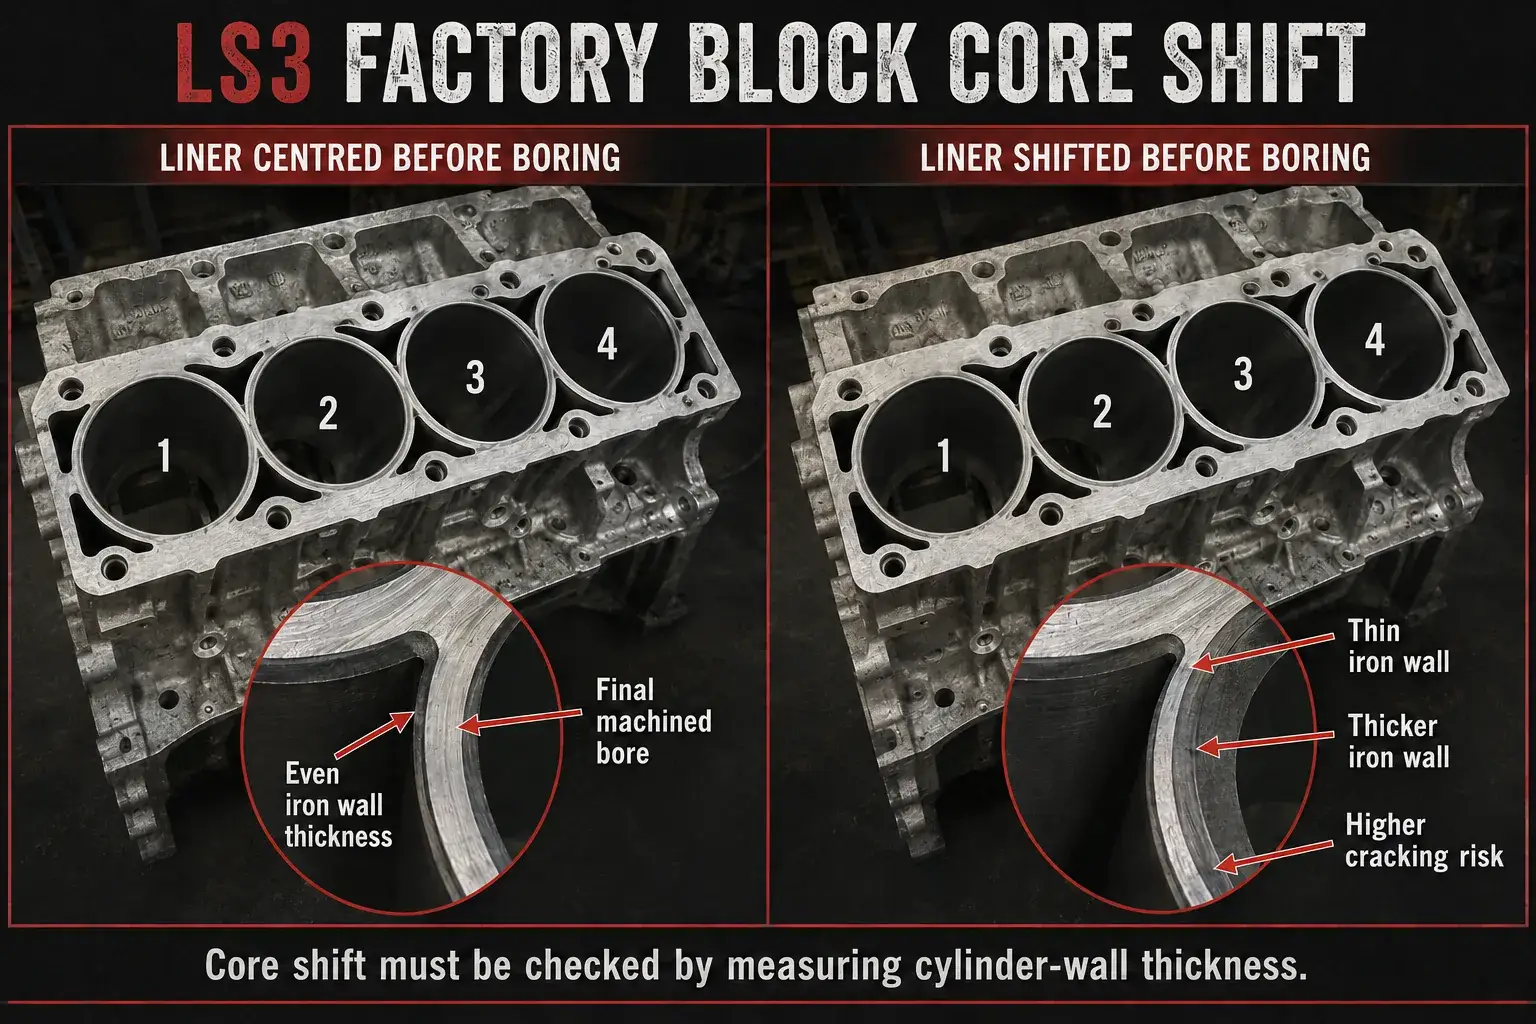
Core shift can make one side of an LS cylinder much thinner than the other.
Why the block must be measured first
Two engines with the same symptoms may need different repairs. Bore wear, taper, scoring and cylinder-wall thickness determine whether a block can be honed, bored or must be sleeved.
Core shift often contributes to cracked cylinders. It may also leave too little material to bore the cylinder enough to remove existing damage. Replacement sleeves can repair selected blocks when a safe conventional overbore is not possible.
Oztrack checks the block and proposed parts before setting the final machining specification.
See Oztrack’s LS engine machining equipment and services →Failures that can lead to a rebuild
A tapping noise, low oil pressure or loss of compression does not reveal the full extent of the damage. A failed part may contaminate or damage other areas of the engine.
- Failed roller lifters and worn camshaft lobes
- Damaged or dropped cylinder-head valve seats
- Cracked, scored or worn cylinder walls
- Broken pistons or ring lands
- Crankshaft and bearing damage
- Low oil pressure and oil-pump faults
- Damage caused by detonation or overheating
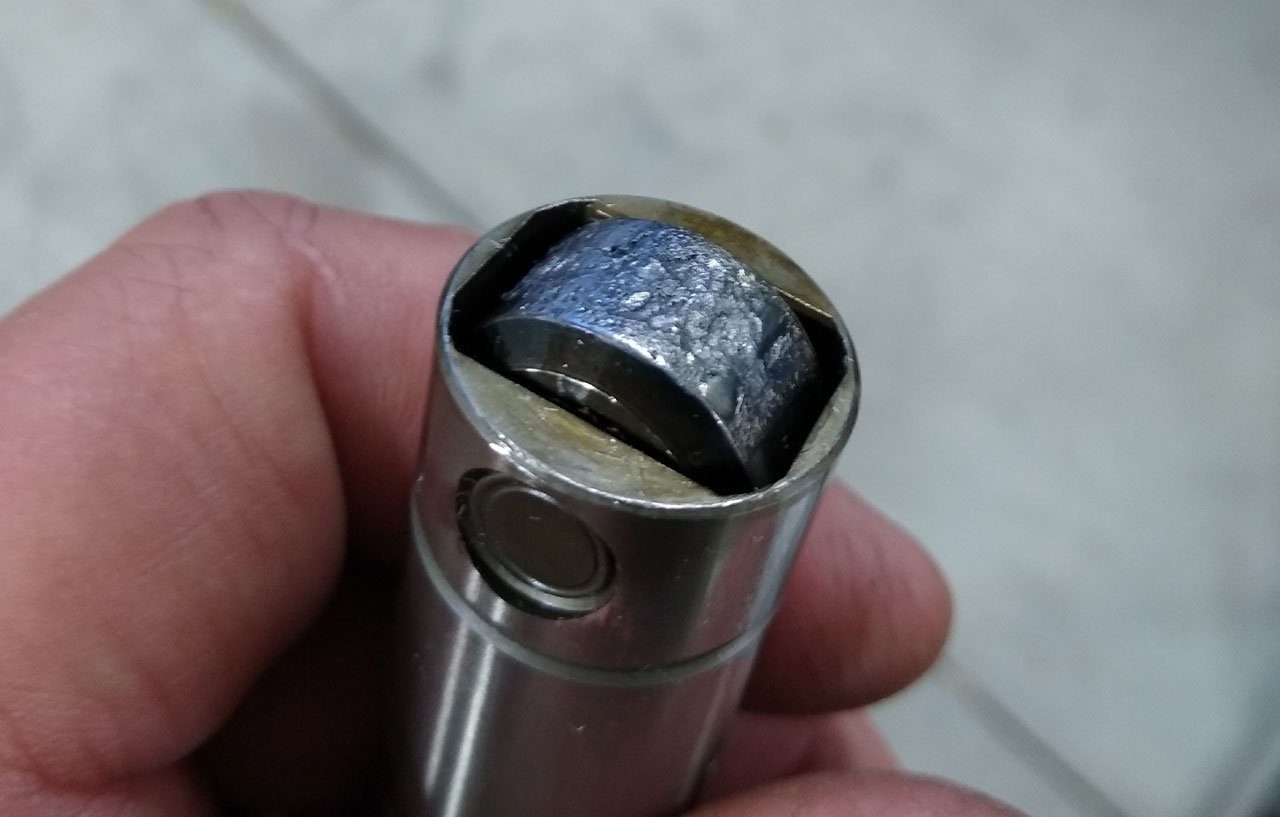
A failed roller lifter can damage the camshaft and send metal through the oil system.
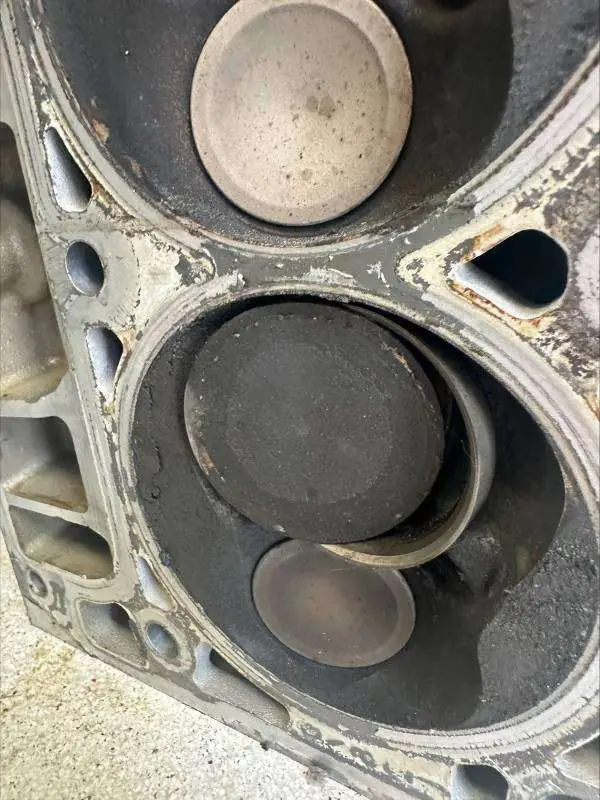
A dropped valve seat in a rectangular-port LS cylinder head can cause severe valve, piston and combustion-chamber damage.
Valve-seat drop in rectangular-port LS heads
LS3, L92 and related rectangular-port aluminium cylinder heads can suffer valve-seat movement or a dropped valve seat. Not every head develops the fault, but when a seat loosens it can prevent the valve from closing and may release the seat into the combustion chamber.
The resulting damage can include loss of compression, a misfire, a bent or broken valve, piston damage and damage to the cylinder head. If fragments enter the cylinder, the repair may extend beyond a normal cylinder-head service and require a complete engine inspection.
During reconditioning, Oztrack inspects the valve seats, valves, guides and combustion chambers. Depending on the damage, the repair may require replacement valve seats, new valves, cylinder-head machining, piston replacement or a different cylinder head.
A new misfire, tapping noise or sudden loss of compression should be investigated before the engine is driven further.
See other LS engine faults and symptoms →The Oztrack LS reconditioning process
The exact work varies with the engine. This is the normal path from diagnosis to a completed build.
Inspect and dismantle
Record the fault, strip the engine and identify visible wear, breakage and contamination.
Clean and measure
Clean the parts and measure the bores, crankshaft, decks, bearing areas and reusable components.
Choose the specification
Select the machining, pistons, rings, bearings, camshaft and valvetrain for the intended use.
Machine the block
Complete the required CNC boring, torque-plate honing, surfacing, sleeving and final measurements.
Prepare the heads
Inspect the valve seats, guides, valves, springs and head surfaces. Repair or replace parts as required.
Blueprint assembly
Set piston clearance, bearing clearance, ring gaps and valvetrain geometry for the combination.
Initial checks
Check oil pressure, temperatures, noises and leaks before the engine is placed under significant load.
Install and tune
For complete vehicle jobs, install the engine and complete dyno testing and calibration where included.
Choose how to supply your engine
| Job type | Best suited to | What Oztrack can provide |
|---|---|---|
| Complete vehicle at Oztrack | Owners who want one workshop responsible for diagnosis, removal, rebuild, installation and tuning. | Vehicle diagnosis, engine removal, machining, assembly, installation, initial checks and tuning where quoted. |
| Removed engine delivered to Penrith | Customers or workshops able to remove and reinstall the engine locally. | Inspection, machining, parts selection, assembly and preparation for collection. |
| Engine freighted to Oztrack | Customers and workshops outside Sydney needing LS-specific machining and rebuilding. | Rebuild planning, machining and assembly, with freight arranged separately after the job details are confirmed. |
Engine supplied separately
Deliver or freight the removed engine for reconditioning at Oztrack.
View the removed-engine option →Complete engine rebuild
Learn how Oztrack inspects, machines, assembles and tests LS engines.
View LS engine rebuilding →Rebuild with cam upgrade
Combine the required repairs with a camshaft and valvetrain matched to the vehicle.
View rebuild and cam options →LS engine reconditioning questions
Can Oztrack quote an LS rebuild before dismantling it?
Oztrack can discuss likely options and starting costs from the engine type, symptoms and intended use. The final machining and parts plan depends on what inspection and measurement reveal.
Can an LS engine be rebuilt without the vehicle coming to Oztrack?
Yes. A removed engine can be delivered to the Penrith workshop or freighted from another area. Your mechanic can handle removal and installation.
Can every worn LS block simply be bored oversize?
No. Existing bore size, scoring, core shift and remaining cylinder-wall thickness determine whether boring is safe. Some blocks require replacement sleeves.
Can a camshaft upgrade be included during reconditioning?
Yes. The camshaft, springs, lifters, pushrods and supporting parts can be selected as part of the complete engine combination.
Can rectangular-port LS heads drop valve seats?
Yes. LS3, L92 and related rectangular-port aluminium heads can suffer valve-seat movement or a dropped seat. The damage may affect the valve, piston, combustion chamber and the rest of the engine, so the complete failure must be inspected before the repair is planned.
Does Oztrack rebuild supercharged LS engines?
Yes. Boosted engines require the pistons, compression, ring gaps, clearances, fuel system and calibration to be considered together.
How long does LS engine reconditioning take?
Timing depends on the engine condition, required machining, parts availability and whether the vehicle is supplied. Oztrack confirms the expected schedule after reviewing the job.
Tell us what is happening with your LS engine
Send the vehicle, engine type, kilometres, symptoms, modifications and intended power level. We can recommend the next inspection or rebuild step.
Oztrack Engine Machining · 8/28 Coombes Drive, Penrith NSW 2750